Tiramisu is one of the classic Italian desserts, a delicious combination of cream, coffee, sugar and egg. A good tiramisu is difficult to find, but I’ve been able to prepare this one for very large crowd…just a little piece goes a long way!

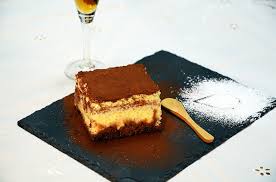
A delicious slice of tiramisu
This is based on Giancarlo Gottardo’s recipe, but it has less sugar and adds whipped egg whites to the custard for the tiramisu.
I also add a chocolate-flavored rum to the zabaglione (custard) that is the basis for the tiramisu. The alcohol in the rum cooks off, but it leaves a delicious flavor.
The tiramisu has a layer of custard on the bottom, topped by a layer of coffee-dipped ladyfingers, with another layer of custard, another layer of coffee-dipped ladyfingers, and then topped with a final layer of custard sprinkled with powered chocolate. This recipe makes enough of the custard for a 13.5 inch by 9 inch rectangular baking pan.
Because it’s so rich, a small piece is just right, and this recipe can serve 40 people easily. That said, I always give the leftover tiramisu from a smaller gathering to my mom, who eats a couple of pieces each day for almost a week. She assures me that the tiramisu seems to get better with each passing day. So don’t worry, even if this seems like a lot of tiramisu, none will go to waste.
When you assemble the ingredients, you need to make sure that you make each part separately and then combine them quickly into the baking pan.
Make the recipe one day in advance so that the ingredients combine together fully before serving it.
Ingredients
- 5 egg yolks, with 3 TB sugar for the zabaglione
- 3 egg whites, with 3 TB sugar (or just use all 5 egg whites, using 1 TB sugar for each). You can reserve the extra whipped egg whites for your coffee the following morning.
- 2 cups heavy cream
- ¼ tsp vanilla extract
- 2 packages of ladyfingers: You need enough to create two layers of ladyfingers in the baking pan
- 3/4 cup fresh espresso, mixed with 2 TB sugar. You can optionally add 1/4 cup of chocolate-flavored rum to the coffee if you are okay with serving a dessert that has a small amount of alcohol in it.
- 2 cups of mascarpone
- 1/4 cup of chocolate-flavored rum (optional) for the zabaglione, plus an additional 1/4 cup that you can add to the coffee if you are okay with
- 1/4 cup of ground dark chocolate (I use my coffee bean grinder to create the powder that dusts the top of the tiramisu)
Preparation
You will need several large mixing bowls ready for this recipe, as well as space in your refrigerator to store each bowl as you complete the steps below. I have found that it’s best to start with the zabaglione, then whip the heavy cream, followed by the whipped egg whites.
Start by taking the two cups of mascarpone from the refrigerator so that they are at room temperature when you mix everything together.
Espresso
- Make 3/4 cup espresso and add 2 TB sugar. You an optionally add about 1/4 cup of chocolate-based rum, if you and your guests are okay with having some alcohol in the dessert. If you prefer it non-alcoholic, make about 1 cup of espresso.
- Refrigerate until you need to assemble the tiramisu.
Zabaglione
The zabaglione is the egg-yolk-based custard that is key to making an excellent tiramisu. You need to be prepared to devote at least 15 minutes of your full attention – and both hands – to the process of making zabaglione. Turn off your phone, make sure you are listening to some good music!
- Prepare a Dutch boiler by putting water high enough to cover the bottom of the inserted pan. If you don’t have a Dutch boiler, select a pot that can hold a heavy Pyrex bowl comfortably, with the bottom part of the bowl immersed in the water.It’s best if you have a pan or bowl with a curved bottom, because you will need to whisk the eggs and sugar, and the curved surface makes the task easier and prevents sticking.
- Turn on the heat to medium/medium high to start heating the water. In the top pan, combine the 5 egg yolks with 3 TB sugar. With a large whisk, begin whisking the egg yolks and sugar, as the water comes to a light boil/simmer.You want to regulate the heat so that the water doesn’t boil too hard. The goal is to make sure that the zabaglione cooks into a thick sauce over the next several minutes.
- Using a whisk, rapidly froth the egg yolks and sugar. Continue mixing over the Dutch oven for about 10 – 14 minutes. If you wish to add the chocolate-based rum, add it in 2-3 increments as you continue to whisk the eggs, sugar, and rum.If you don’t add the rum, add about 1/4 cup of the boiling water in small increments.
- When the mixture becomes thick, like a mayonnaise, the eggs have become pasteurized, and the zabaglione is ready.
- Remove the top part of the Dutch oven (or the Pyrex bowl) from the heat and continue to whisk for a couple of more minutes. This allows the custard to cool down and become slightly thicker. Once it has cooled to a tepid temperature, you can stop whisking and place the bowl/pan you’re your refrigerator while you prepare the rest of the ingredients.
Whipping Cream
- In a cold mixing bowl, add the whipping cream and vanilla extract.
- Mix until the whipping cream is light and fluffy.
- Put into the refrigerator. Clean the blades on your blender before starting the next step.
Egg Whites
- Just before combining ingredients for the tiramisu, make the egg white mixture. In a mixing bowl, add the 3 egg whites and 3 TB sugar.
- Whip until the egg whites form stiff peaks.
Combining All Ingredients
- With a silicon/rubber spatula, lightly fold—by hand—the mascarpone with the whipping cream in your largest bowl. Do not overmix – the mixture should be a combination of lumpy and fluffy, like summer clouds.
- Now fold the zabaglione mixture into the combined mascarpone/whipping cream.
- Next, gently fold approximately 1/2 to 2/3 of the whipped egg whites into the mixture.
- Spoon a layer of the zabaglione/mascarpone/egg white mixture into a rectangular baking pan.
- Now add the first layer of coffee-soaked ladyfingers. I usually line up the ladyfingers, a flat-bottomed bowl containing the coffee, and the rectangular baking pan.Working quickly, one ladyfinger at a time, I dip a ladyfinger into the coffee, then place it gently on the layer of custard. I create a layer of ladyfingers, lined up like little soldiers, over the custard.
- Add a layer of custard over the ladyfingers.
- Next, add a second layer of ladyfingers, following the same process as above – dip each ladyfinger in coffee, then gently place it over the custard in the baking dish.
- Layer the last of the custard over the ladyfingers.
- Sprinkle the powdered chocolate over the top of the pan.
- Cover with aluminum foil and place in the refrigerator at least 8 hours to allow the custard to set.


