
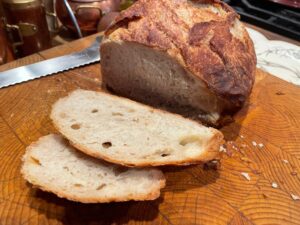
Home made bread is the best!
We started making bread at home when one of our favorite shops stopped making the type of bread we preferred — a crusty loaf with an airy middle. After searching for recipes and a fair amount of experimentation, we found that this recipe works best for us. We make it several times a week, with an extra loaf or two before friends come over for dinner. It’s always a hit!
- Yield One 1 loaf of bread (1/2 lb.)
- Time 1 hour 30 minutes, plus about 20 hours’ resting time
This recipe is largely based on Mark Bittman’s original No-Knead bread recipe, one of the most popular recipes The Times has ever published, courtesy of Jim Lahey, owner of Sullivan Street Bakery (here’s the recipe link: https://cooking.nytimes.com/recipes/11376-no-knead-bread).
While Mark Bittman’s original recipe did not require any kneading, the bread becomes airier when a small amount of kneading is done during the 18+ hour fermentation process. See my variations on this great original Bittman recipe below.
Cooking Time
- 45 minutes, plus 18+ hour fermentation
Ingredients if Using Active Dry Yeast
- 430 grams all-purpose flour, plus more for dusting
- ¼ teaspoon instant yeast
- (I use SAF, which is recommended by King Arthur Baking Company: https://shop.kingarthurbaking.com/items/saf-red-instant-yeast)
- 2-3 teaspoons sea salt
- 390 ml lukewarm water (between 105°F and 115°F on an instant-read thermometer)
- I use my kitchen scale to weigh the water as I pour it into the bowl with the flour, salt, and yeast. One ml of water weighs 1 gram, so it’s easy. I simply zero the scale after mixing the dry ingredients, then turn it on to measure 390 grams of water as I add them to the mixing bowl.
NOTE: If you are making this with all whole-wheat flour, use 420 ml of water, because the whole wheat flour needs a bit more water.
Preparation
- In a large glass or metal mixing bowl combine flour, yeast, and salt. Use a whisk to mix the dry ingredients thoroughly.
- Add the lukewarm water (105°F to 115°F) and stir with a wooden spoon until it’s blended; the dough will be shaggy and sticky.
- Cover the bowl with a tight-fitting lid or with plastic wrap. Let the dough rise at room temperature for twenty minutes.
- Remove the lid/wrap, wet your hands with warm water from the kitchen faucet, and then reach into the bowl to pull the dough from the outside edge to the middle. Rotate the bowl as you pull the dough until you have rotated the bowl completely around (360-degree rotation), and then quickly flip the dough upside down. Re-cover the dough to prevent it from drying out.
- Let the dough rise another for another twenty to thirty minutes, then repeat the “pulling” process. Repeat this “pulling process” another couple of times, for a total of 4 times.
- Cover the bowl and put it into the refrigerator for at between 8 to 12 hours. You can keep it in the refrigerator up to 36 hours, but I like it best after 12 hours.
- Remove the bowl from the refrigerator at least 6 – 10 hours before you plan to bake the bread.
- Wet your fingers so the dough won’t stick to them, and then fold the dough over itself once or twice while it remains in the same bowl in which you allowed it to rise in the refrigerator. Cover the dough loosely with plastic wrap (or with the container’s lid) and let it rest another 15 – 20 minutes.
- Wet your fingers again, then form the dough into a ball. Cover the container, or loosely place plastic wrap over it if you don’t have a container, allow it to rise at room temperature for 6-8 hours, until you plan to bake it.
- When it is ready, the dough will be at least double in size and will not readily spring back when poked with a finger.
- At least a half-hour before you plan to bake the bread, heat oven to 450°F. Put a 6-to-8-quart heavy covered pot (cast iron, enamel, Pyrex or ceramic) in the oven as it heats. (This is especially important if you are using a ceramic pan because it will break if it does not heat in the oven from cool to 450°F).
- When the oven is pre-heated, carefully remove the heated bread pot from the oven. If you don’t have a silicone dough sling (or parchment paper) to lay at the bottom of the bread pan, sprinkle a little bit of flour on the bottom and sides of the pot to help prevent the cooked bread from sticking.
- Quickly wet your fings and quickly and gently lift the dough from the bowl where it’s been rising, and place the dough directly into the hot bread pan. It may look like a mess, but that is okay. Shake the pan once or twice if the dough is unevenly distributed; it will straighten out as it bakes. Cover the pan/ceramic pot with its lid and bake for 30 minutes, then remove the lid and bake another 15 minutes (or so), until the loaf is beautifully browned.
- As soon as you remove the bread from the oven, remove it from the hot baking pan. Cool it on a rack (or on the cool burners of your stovetop) so that air can flow around it for at least 10 minutes.Keep in mind that bread making with a non-commercial oven requires that you adapt to circumstances such as your altitude and humidity. If you live at sea level in a humid environment, you may need to reduce the water added to the dough. If your bread is consistently too “wet” in the middle after cooking it the usual 45 minutes, you can put it back into the oven at 350°F for another 10 minutes. This usually resolves the problem of it being too “wet.”